Syntrio Customer Success Center
Search our knowledge base and articles, or submit a request.
Adding External Content to the E10 LMS
Several options are available to you for uploading your organization’s documents, presentations, or online assets to the LMS. Among them include the ability to track your users’ access (Quick Click), acquire their acknowledgment of the information contained therein (Simple Attestation), or even have them respond to specific questions pertaining to the information shared (User Questions/Feedback). In addition, you may also add SCORM or AICC files for external courses.
Getting Started
If using a particular document or presentation file, you must first upload your document to the LMS to create a URL link. This step does not apply to SCORM/AICC files or to pre-existing URL links (such as to documents housed on your intranet or to videos hosted online):
– Go to System / LMS Configuration Options
– Then select the Upload Files tab (to the far right)
– Select Choose File and browse to locate your document, then select Upload.
– To locate your added document, click the custom content/graphic files link and locate your file name within the folder. Click the link to your document to open. The file will open in a new window. Keep this window open as you will need it later.
Online Course (SCORM 1.2 or AICC)
This type of delivery option allows you to add course material that has specifically been created in the industry training standards of SCORM 1.2 or AICC. This would include courses created in authoring tools and courses from online courseware vendors. Both can interoperate with the Syntrio LMS in order to track launch, time spent in the course, score, and track completion with pass and fail.
1) Add the document to your Catalog, where it will live with your online courses:
– Go to Catalog / Search and Manage Catalog
– Choose + Add Course
– Delivery Type: Online / Via Scorm 1.2 Import OR AICC
– Select File to Upload (select the ZIP file to upload).
NOTE: The zip must contain only the COURSE FILES, NOT A FOLDER THAT CONTAINS THE COURSE FILES. This is the only way that the upload will work.
– Guidance for the naming of the zip file: To make sure there is no problem with later updates, please follow the naming conventions below for your zip file and your course code.
-Make the name of the course the same as the course code you choose. This ensures that the course name chosen is UNIQUE.
-Do not include spaces or special characters other than “-” or “_” as the name of the zip file or the course code. This will ensure that there is no confusion in uploads in the future.
– Choose the Category, Sub-Category (if applicable), Training Format, and Vendor (if applicable).
– Click Import.
-Once the course is uploaded, you will EDIT the course name and CHANGE the course code, to the same zip file name. You can also update the time duration, the abstract, or the introduction to the course. Save at the bottom of the page, once entered.
-Click on Edit Sco Item Tab and check the passing score. Click on the pencil icon to the right to review the passing scores setting. This is useful when going through the course to ensure that the course completes and passes correctly.
– The course will be imported. Now test the launch of the course, making sure that the course DOES launch correctly. It is also good to test a couple of other features within the course – bookmarking and completion. Note that not all courses will send back bookmarking information to the LMS.
Quick Click
This type of delivery option allows you to quickly add an online resource – an example being a simple Code of Conduct or an informational piece in PDF form – so that once the user clicks on the document, it will register as a successful “completion” in the LMS.
1) Add the document to your Catalog, where it will live with your online courses:
– Go to Catalog / Search and Manage Catalog
– Choose + Add Course, then complete each of the following fields:
- Delivery Type: Online / Manually
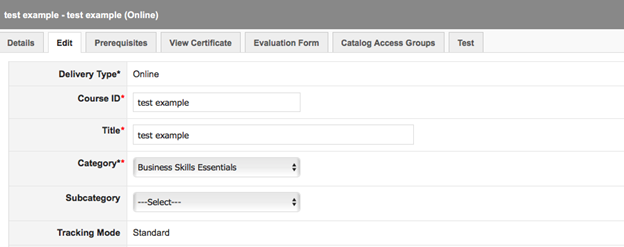
- Add a Course ID (or description) and a Title for your document or presentation.
- Tracking Mode: Quick Click
- Training Format: Other (*or create a new training format option – see below)
- To add a new training format category, select Catalog / Training Formats.
- Select + Add, then assign a name for your new training type. Hit Add.
2) From the Edit tab:
– Add content to the Abstract section.
(This will describe the purpose of providing this document to your users.)
– If using a document saved to the LMS, return to the tab containing the HTML link to your document (refer to initial Step 1) and copy the URL.
– Paste the copied URL (or URL to your online asset) into the Launch URL field.
– Add an approximation of minutes for time spent on the material under Duration.
– Then Save.
Simple Attestation for Completion
This type of delivery option allows you to quickly add an online resource – something like a PDF or a linkable video – so that when the user clicks on it and views it, they will be required to check off that they have reviewed for a completion to be recorded. Note: any documents that you want to have open directly into the LMS will need to be saved in a PDF format first.

1) Add the document to your Catalog, where it will live with your online courses:
– Go to Catalog / Search and Manage Catalog
– Choose + Add Course, then complete each of the following fields:
- Delivery Type: Online / Manually
- Add a Course ID (or description) and a Title for your document or presentation.
- Tracking Mode: Standard
- Score Applicable: No [this is the default]
- Training Format: Other (*or create a new training format option – see below)
- To add a new training format category, select Catalog / Training Formats.
- Select + Add, then assign a name for your new training type. Hit Add.
2) From the Edit tab:
– Add content to the Abstract section.
(This will describe the purpose of providing this document to your users.)
– If using a document saved to the LMS, return to the tab containing the HTML link to your document (refer to initial Step 1) and copy the URL.
– Paste the copied URL (or URL to your online asset) into the Launch URL field.
– Add an approximation of minutes for time spent on the material under Duration.
– Then Save.
User Questions/Feedback
This type of delivery option allows you to quickly add an online resource – something like a PDF or a linkable video – so that when the user clicks on it and reviews it, they will be prompted to complete questions at the conclusion in order to satisfy completion. Note: any documents that you want to have open directly into the LMS will need to be saved in a PDF format first.
You will use the Test Builder feature (see Creating a Response Form Using Test Builder in the following section) to format your document for completion.
1) Add the document to your Catalog, where it will live with your online courses:
– Go to Catalog / Search and Manage Catalog
– Choose + Add Course, then complete each of the following fields:
- Delivery Type: Online / Manually
- Add a Course ID (or description) and a Title for your document or presentation.
- Tracking Mode: Standard
- Score Applicable: Yes (*this field cannot be edited – please be sure to select Yes)
- Mastery Score: You may change the percentage threshold for successful completion.
- Training Format: Other (*or create a new training format option – see below)
- To add a new training format category, select Catalog / Training Formats.
- Select + Add, then assign a name for your new training type. Hit Add.
2) From the Edit tab:
– Add content to the Abstract
(This will describe the purpose of providing this document to your users)
– If using a document saved to the LMS, return to the tab containing the HTML link to your document (refer to initial Step 1) and copy the URL.
– Paste the copied URL (or URL to your online asset) into the Launch URL field.
– Add an approximation of minutes for time spent on the material under Duration.
– Then Save.
Creating a Response Form Using Test Builder
You can assign a series of questions associated with the materials presented for your user’s response at the conclusion of the document (* ‘Standard’ tracking and Score ‘Yes’ must be selected to apply).
1) Go to Catalog / Search and Manage Catalog, select your document, and click the Edit tab.

2) Click on the Add Test tab at the far right, then +Add Question.
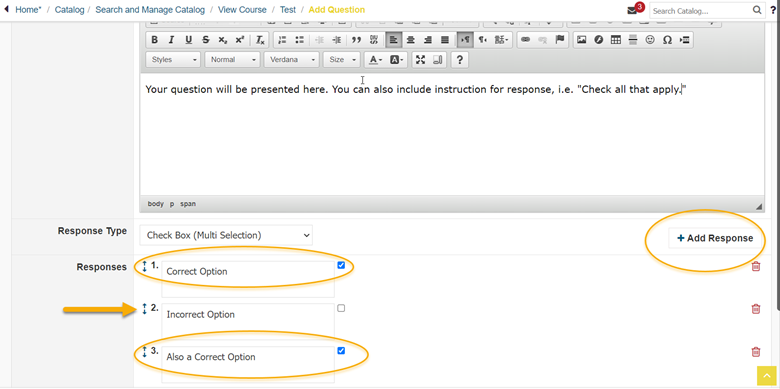
– Enter your question into the text field and apply any preferred formatting.

3) Select one of the options below from the Response Type drop-down:
- Check Box (Multi-Selection)
- Dropdown List, (Single Selection only)
- List Box (Multi-selection)
- Radio Button (Single Selection only)
– If you require more answer options, select +Add Response and select # to add.
– Should you have added too many answer options, click the trash can icon to the right to discard.
– Check off the correct or accepted answer (or answers, if multi-selection) for the question.
– Answers may be reordered by holding down on the up/down arrows icon and dragging to the
preferred position.
– Click Save.

4) Your question will appear for your review.
– Click the pencil icon to the right to edit any aspect of the question or select the trash icon to delete.
– When ready to release to your users, select Unlock.

5) Repeat this process to add any additional questions for your material.
6) If at any point a question requires an update, open the document from your Catalog and select the Test tab, then Lock for Editing to make any necessary changes.
No Tracking
This type of delivery allows you to quickly add any online resource on the organization’s intranet or the internet that is useful for your users – and there is no need to track your users’ access. This is an excellent way to group useful documents for your organization.
1) Add the document to your Catalog, where it will live with your online courses:
– Go to Catalog / Search and Manage Catalog
– Choose + Add Course, then complete each of the following fields:
- Delivery Type: Online / Manually
- Add a Course ID (or description) and a Title for your document or presentation.
- Tracking Mode: No Tracking
- Training Format: Other (*or create a new training format option – see below)
- To add a new training format category, select Catalog / Training Formats.
- Select + Add, then assign a name for your new training type. Hit Add.
2) From the Edit tab:
– Add content to the Abstract section.
(This will describe the purpose of providing this document to your users.)
– If using a document saved to the LMS, return to the tab containing the HTML link to your document (refer to initial Step 1) and copy the URL.
– Paste the copied URL (or URL to your online link) into the Launch URL field.
– Add an approximation of minutes for time spent on the material under Duration.
– Then Save.
Still can’t find an answer?
Submit a Request and we will get back to you.

